 This is a collection of resources that helped me to learn WordPress, I’ve tried to put some of the basic information here for easy access, but I also have included links to my many sources that will go into more detail on each subject. This post covers a lot of basics, but this post is intended for those of you who:
- have a basic knowledge of CSS
- at minimum, you know what PHP is and are willing to learn a little
- understand the following terms: CSS, PHP, mysql, database, ftp, server, host, domain…
What do I need to get started?
Besides the obvious like, an internet connection and keyboard, here are a few things you’ll want to put in place before getting started that will make the process as simple as possible.
- You’ll need a server to host your website files: to avoid possible headaches, i suggest hosting on a UNIX server, you will need both PHP and mysql capabilities.
- Set up a domain and make sure the DNS points to where your site is being hosted. (if you purchased your hosting and domain together, this is most likely already set up for you and you don’t need worry about it.)
- Create a mysql database on your server for your WordPress installation.
- If you do not have something installed already, you will need some sort of code editing software. There are a lot of options depending on your skill level, work style and operating system. For a larger list of wares, check out Smashing Magazines, CSS Editors Reviewed
- Mac users: Coda, TextMate, BBEdit, Dreamweaver, Xyle
- Windows users: EditPlus, TopStyle, Dreamweaver
- All users (that means Linux too): Komodo Edit
- The other piece of software you will need to install if you do not already have one is an FTP client, this will allow you to upload your files to your server.
- Lastly, download the latest version of WordPress.
Got all your prep work completed and your tools ready? Great! Now it’s time to get started…
How do I install WordPress on my server?
Once you’ve extracted the WordPress software download, open (in your editor) the wp-config-sample.php, input your mysql database information and then save the file as wp-config.php.
At the top of the file, you will see the following code, just plug in the database info as the comments instruct.
<?php
// ** MySQL settings ** //
define('DB_NAME', 'databasenamehere'); // The name of the database
define('DB_USER', 'usernamehere'); // Your MySQL username
define('DB_PASSWORD', 'passwordhere'); // ...and password
define('DB_HOST', 'localhost'); // 99% chance you won't need to change this value
define('DB_CHARSET', 'utf8');
define('DB_COLLATE', '');
In the 1% chance that you do need to change the default ‘localhost’ setting for the DB_HOST, it is usually something like mysql.yourdomainname.com.
Once the wp-config.php is saved, upload all of the files in the WordPress folder onto your server. If you don’t want all those php files in your root directory, put them into a folder called something like “blog” or “site.” Once all the files have uploaded go to the address where your files live and simply follow the prompts to complete the install.
IMPORTANT: At the end of the install process you will receive a random password, this is not emailed to you so write it down, copy and paste it somewhere safe, take a screen capture, whatever you need to do, just make sure to make record of it before leaving that screen.
WordPress has been installed. Were you expecting more steps? Sorry to disappoint.
Need more information? Check out WordPress.com’s Famous 5 Minute Install or How to install WordPress Manually
How do I customize my WordPress theme?
The easiest way to learn how to customize WordPress themes is to start with an existing theme and modify it to fit your needs. After doing this, you will get more familiar with the way themes are set up and the capabilities, then starting a theme of your own from scratch won’t sound so overwhelming. Unless you are a CSS Ninja, and have some knowledge of WordPress already (in which case, this post isn’t really for you) creating a custom theme from scratch is a huge undertaking, so start slow.
Check out the WordPress theme library and find a theme that is close to what you would like. Pay attention to layout more than color as when you’re beginning changing the look of your WordPress pages is going to be much easier that changing the format.
More Theme Resources: 100 free high-quality WordPress themes
Quick & Dirty Customizing Tips
- Before attempting to change anything, take a look at the style.css file and image folder first. By seeing the parts of the site that are images, you will already be able to see some very quick ways to personalize an existing theme. Changing a header image, and background image can give a theme a completely new look and will only take a short amount of time, and virtually zero “know how.”
- Having trouble figuring out what id’s/classes relate to which parts of your theme? Try adding a bright colored background-color: to that element so that if stands out to you.
How do I change the link in the main navigation?
Most theme’s by default are set up to display all of your WordPress pages in the main navigation, to change this, you’ll either be editing the header.php or sidebar.php file.
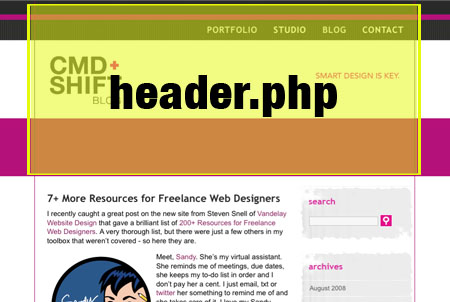
The header.php file holds your pages head tags, meta tags, links to style sheets etc. The area highlighted above in yellow shows the portion of the page that comes from the header.php file. If you wish to add in your own links to the header, just use HTML and add them into the header, then style appropriately. If you want your WordPress pages displayed in the main navigation and this is not set up on your theme, you’ll only need a small chunk of code to make this happen.*
<ul id="nav">
<?php wp_list_pages('depth=1&title_li='); ?>
</ul>
Pop this bit where you would like your navigation and style the “nav” element as you wish.
I want to use widgets in my sidebars, but they’re not “widget-ready.”
Widgets allow you to add all sorts of functionality to your WordPress pages with out having to even even look at code, however in order to utilize them, your theme must be “widget-ready” meaning the pages sidebar must have a bit of code in it that says “this is where the widgets can go!” To make your pages widget ready you will need to edit both your sidebar.php file and your function.php file, and add the following…
Add to sidebars where widgets are to appear.* This code is for the first sidebar (1). Some themes have more than one widget-ready area of the page.
<ul class="sidebar_list">
<?php if (!function_exists('dynamic_sidebar') || !dynamic_sidebar(1)) : ?>
<?php endif; ?>
</ul>
*Note that the element identifiers may vary from theme to theme.
Next you will need to be sure to update your function.php file. Again the number in parentheses refers to how many areas of the site are widget-ready.
<?php
if ( function_exists('register_sidebars') )
register_sidebars(2);
?>
How can I have more than one layout template on my WordPress site?
 The default page template for most themes is the index.php file, then there is usually an archive.php template and sometimes a links.php template. If you have multiple templates to choose from, you can change the template of any Page by specifying the new template in your WordPress editor.
To create your own templates it just takes another small bit of code. Check out the video below and see how simple.
<?php /*Template Name: New Template Name
*/ ?>
Can I use WordPress as a CMS?
It is first and foremost a blogging platform, but that doesn’t mean that it can’t be used for other things as well. Here are a few things to consider when choosing WordPress as a CMS. Utilize plugins and techniques to strech the WordPress Admin to new heights. Check out the Top 10 WordPress CMS Plugins.
great information! I am going to use some of your tips on my next stab to get into wordpress.
Excellent and easy to read post! Time to do some experimenting!
I need your help…
in feb this year i started this http://www.wscoop.com its a resource for developers and designers.
But I need help
I need links to web design and development, site , articles links…… anything you think of….
Please are you able to help me make this into a great resource for developers and designers.
i’ll check out your site Paul!
Hey,
I am, Joseph
lots of info on here
This is great information. I’m starting to get story ideas zooming in my head.
I don’t know If I said it already but …This blog rocks! I gotta say, that I read a lot of blogs on a daily basis and for the most part, people lack substance but, I just wanted to make a quick comment to say I’m glad I found your blog. Thanks, :)
A definite great read..Tony Brown
Thanks Tony! This is a great compliment, I am glad you enjoy the blog and I really want to THANK YOU for reading and commenting!
how can i change sidebar link background color? please help..!
should just be able to apply the color to the a:links within your sidebar div. If you’re not familiar with CSS – you’ll have to get yr hands a little dirty with it! Good luck!